Integration of Razorpay in Flutter


In the dynamic world of mobile app development, providing a seamless and secure payment experience is crucial. Flutter, known for its cross-platform capabilities, has found a formidable ally in Razorpay — a leading fintech solution. The integration of Razorpay with Flutter brings forth a powerful synergy, enabling developers to incorporate robust and user-friendly payment functionalities into their mobile applications. This collaboration not only streamlines the payment process but also ensures a delightful and trustworthy transaction experience for users. Joining forces with Razorpay, Flutter developers can effortlessly elevate the financial interactions within their apps, unlocking a new realm of possibilities in the digital payment landscape.
Requirements :- razorpay_flutter:
**Steps to be Performed For Implementation Of Razorpay In Flutter:-
Add Dependency To Pubspec.yaml :-**
razorpay_flutter:
razorpay_flutter:

Create Your Razorpay Account:-
Navigate to the Razorpay website through Google search or by following the provided link. After clicking, proceed to register by entering your email and password. Additionally, provide essential details, including your phone number, to facilitate a swift and secure sign-up process.

Razorpay Website
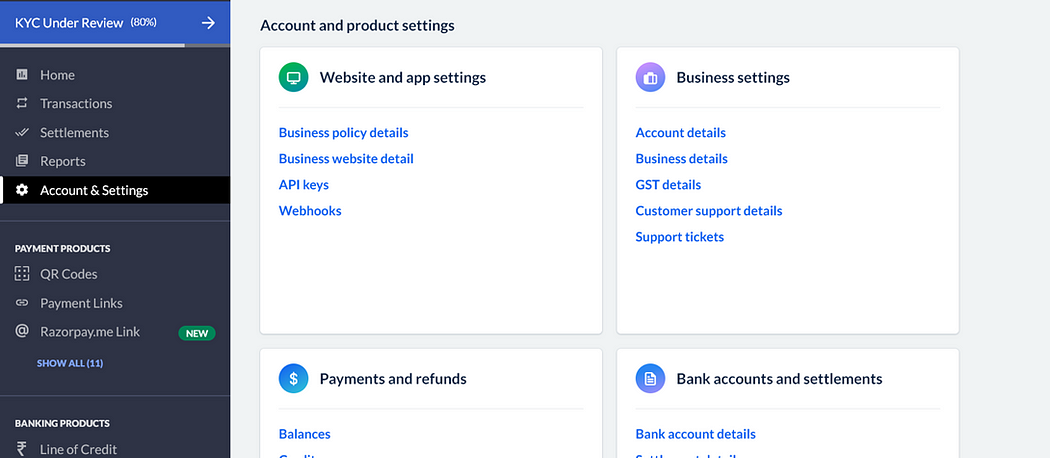
**Get Your Key:-
**Locate the ‘Account and Settings’ option on the left panel of your screen. Upon selecting it, navigate to ‘API Keys’ within the ‘Website and App Settings’ section. Click on ‘API Keys’ to access and retrieve your unique API key for seamless integration with your application.
\>>The key will start from ‘rzp_test’ this means that the API that is being provided is a test API.
**Create Razorpay Instance:-
**To unlock the full suite of functionalities and variables offered by Razorpay, it is essential to instantiate an instance.
var _razorpay = Razorpay();

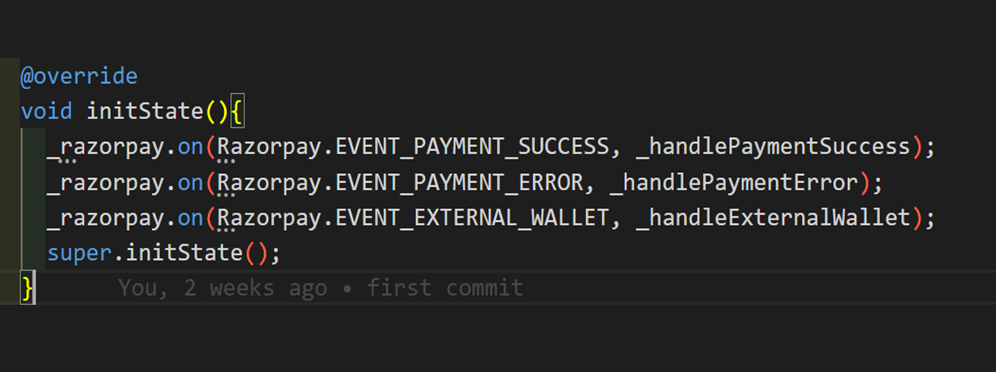
Add Event Listner:-
Event listeners are used to detect and respond to specific events, such as user interactions or system changes, enabling interactive and responsive behavior in applications.
- Create the functions to Handle Different Events
 void _handlePaymentSuccess(PaymentSuccessResponse response) {
  // Do something when payment succeeds
  }

  void _handlePaymentError(PaymentFailureResponse response) {
  // Do something when payment fails
  }

  void _handleExternalWallet(ExternalWalletResponse response) {
  // Do something when an external wallet is selected
  }

2. Add these functions to event Listener:-
Attach the above mentioned functions, to event Listener.
@override
  void initState(){
    _razorpay.on(Razorpay.EVENT_PAYMENT_SUCCESS, _handlePaymentSuccess);
    _razorpay.on(Razorpay.EVENT_PAYMENT_ERROR, _handlePaymentError);
    _razorpay.on(Razorpay.EVENT_EXTERNAL_WALLET, _handleExternalWallet);
    super.initState();
  }
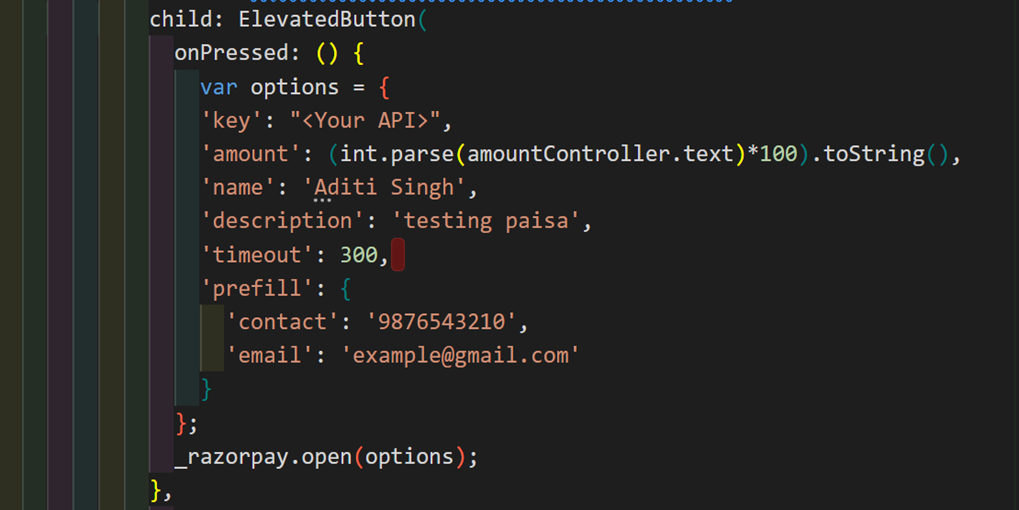
**Add Checkout Option:-
**Integrate the checkout option within the button. Substitute <Your API> with the API provided by Razorpay. Manually input the amount using a TextEditingController.
var amountController = TextEditingController();

Use your contact number since you will receive an OTP on that particular number.
onPressed: () {
  var options =
  'key': "<Your API>",
  'amount': (int.parse(amountController.text)*100).toString(),
  'name': 'Aditi Singh',
  'description': 'testing paisa',
  'timeout': 300,
  'prefill': {
              'contact': '9876543210',
              'email': 'example@gmail.com'
              }
     };
   _razorpay.open(options);
  },
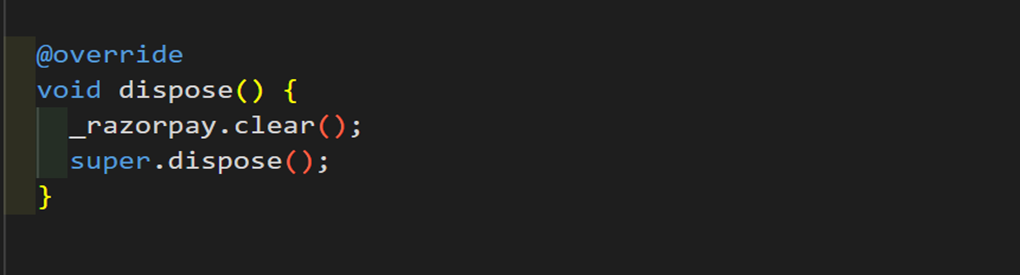
Close Razorpay:-
Ensure to close each function you initiate for proper code structure and execution.
  @override
  void dispose() {
    _razorpay.clear();
    super.dispose();
  }
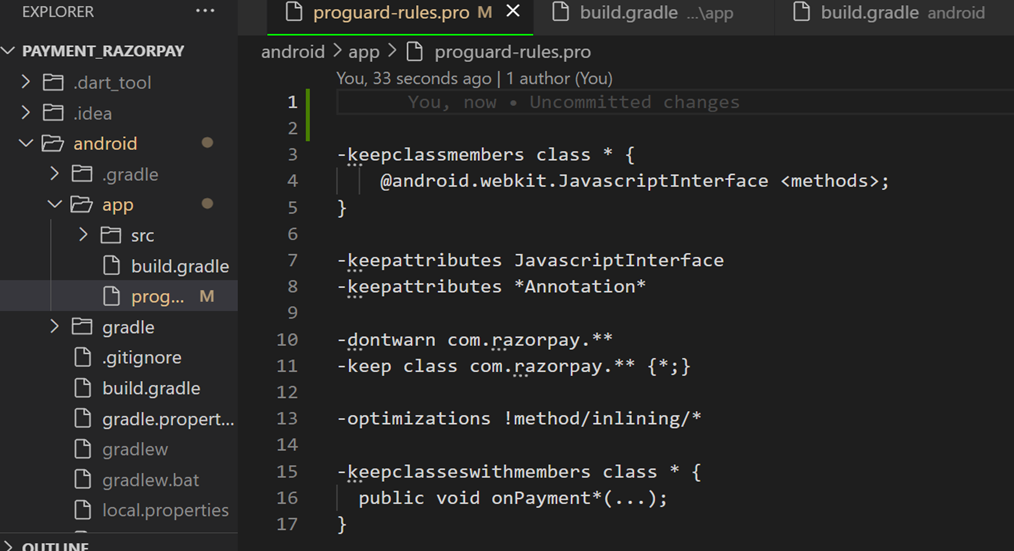
**Add File in Android:-
**You need to create a new file in
your_project>android>app>proguard-rules.pro
-keepclassmembers class * {
    @android.webkit.JavascriptInterface <methods>;
}

-keepattributes JavascriptInterface
-keepattributes *Annotation*

-dontwarn com.razorpay.**
-keep class com.razorpay.** {*;}

-optimizations !method/inlining/*

-keepclasseswithmembers class * {
  public void onPayment*(...);
}
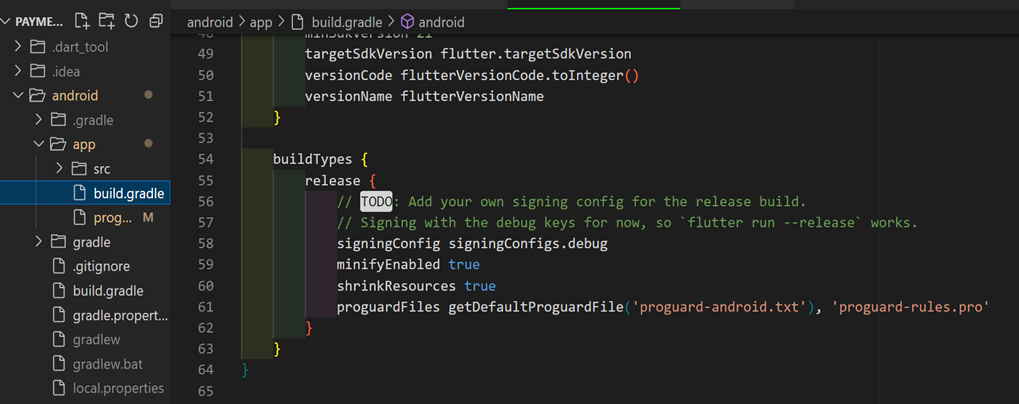
Moreover to access this file you also need some changes your_project>android>app>build.gradle in file.
buildTypes {
        release {
            signingConfig signingConfigs.debug
            minifyEnabled true
            shrinkResources true
            proguardFiles getDefaultProguardFile('proguard-android.txt'), 'proguard-rules.pro'
        }
    }
Now, you’re all set with your Flutter app seamlessly integrated with Razorpay. If you need additional assistance, feel free to check the GitHub repository for further guidance.